
One of the greatest strengths of the Smash Box is the customizability you get from its Designer Software. With it you can shift button layouts around to better fit the game you are playing or your playstyle. You can also customize what angles you can access on your Smash Box, to provide yourself with more options across different games or get specific inputs in your speedruns. This blog will overview the basics of changing those angles.
First, download the latest Designer Software: downloads.
Second, review how Tilt Modifiers work on the Smash Box. This will help you understand not only what will be referred to in this post, but also give you an idea of what you would like to specifically edit on your profile.
If you are trying to design modifiers to use in Smash or other platform fighters, please use our Input Mappings document as a reference. This will help guide you on how to get the most accurate modifiers for what you want to do.
The Basics
The first thing to note is that all angles on the Smash Box will require a diagonal input (vertical + horizontal inputs) from the directional buttons, and to change what the angle becomes you will hold a tilt modifier down along with the diagonal input.
So the best way to change the angles you want to use, you will want to edit the tilt modifiers in the Designer Software.
Important: These values that you will edit are relative to the 'center' value of the directions (determined by the Default Values of the profile), with lower values being closer to center and higher values being further away from center. This means a value of 0 is equal to the 'center' position, and any larger numbers are further from the 'center' position. (The only exception being what we cover in the "Advanced Customization" section below.)

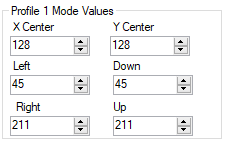
This is what a Profile tab should look like, and this is where you will edit the values of tilt modifiers.

These are the values you will want to focus on editing. They are located on the top left side of the profile tab.
Note: Ensure you have the tilt modifiers you are editing for angles set on your button layout as well.

These options will help you determine what angle you are actually getting with your editing. The example above is showing what the values of "Tilt X" and "Tilt Up" give you as an angle.

When you click on the options, a menu will pop down and show you what inputs you can select. The option on the left are the x-axis inputs, the option on the right are the y-axis inputs.

Once you have selected which inputs you want to be shown, to the right it will show your "last click." This will show both the actual coordinate values that have been selected, as well as the angle in degrees.
Check out the "Angle Visualizer" section near the bottom for alternative way to edit the values of modifiers.
Customizing Multi Tilts
Multi Tilts are the easiest tilt modifier to customize to get a specific angle, since both of the x- and y-axis values you will need to edit for it are right next to each other. To showcase how to customize Multi Tilts, we are going to use Tilt 1 as an example.

On the left side, these are the values we will be editing.

On the top right, these are the options we want selected to see what angle we are going to get with our values.

And to the right of those options, this is what we will be looking for to ensure we are getting the angle we want.
Currently, the angle is at 39.7° and angle we are going to change it to is 50° (or close to it).
Note: At first it may be difficult to determine what value to edit and what to edit it to, but by experimenting with values you may get the idea pretty quick. A good rule to keep in mind is: if the X value is greater than Y, the angle will be below 45° - and if the Y value is greater than X, the angle will be above 45°.
We are going to increase the Y Up value so it is more than the X value, and see what happens.


We changed the Y Up value to 50, and kept the X value the same. This ended up giving us an angle of 46.8° - which is pretty close to what we want. We will increase Y Up a little more and see what we get.


This time we changed the Y Up value to 56, while still keeping the X value the same, and we got lucky and got 50° exactly! (You will not always be able to get the exact angle you are aiming for.)
Save this to the Smash Box, and test how it looks in game by pressing Up + Right/Left + Tilt 1.
Customizing Linear Tilts
Linear Tilts a little more difficult to customize since it can require some planning ahead, understanding what Linear Tilts do, and forces you to take into account the default values of regular directional inputs. To showcase how to customize Linear Tilts, we are going to use X1 as an example.

This is the value we will be editing to get the angle we want.

Linear Tilts only modify one axis, so our main focus will be on the axis that it does modify. In this case, X1 only modifies the x-axis, so that will be our focus. And since X1 doesn't modify the y-axis, we will want to use the default Y value for our directions, in this case we will be using Max Up.
Note: The "Max" of Max Up simply refers to the default value of the directions on the Smash Box. However, these default values can be customized too. More on that below.

With the correct options selected, we now can see what the current angle is with X1. (The "83" value is the value of "Max Up")
This angle is steep, so let us make it a little more shallow. We will customize the angle down to 65°. We will do this by increasing the value of X1.
Note: Linear Tilts also tend to be more difficult because typically you are only ever editing one value and do not control both. To make it easier, there's a few things to know. 1) Most of the time, Linear Tilts have smaller values than the Max values. 2) Lowering the value of a Linear Tilt will bring it closer to a cardinal direction (Up, Down, Left, Right), depending on what axis it modifies. 3) Increasing the value of a Linear Tilt will bring it closer to the 45° angle.


We increased the value of X1 to 38, and got an angle of 65.4° - which is really close to what we wanted!
Save this to the Smash Box, and test how it looks in game by pressing Up + Right/Left + X1.
Advanced Customization
The information above is what most people customizing their angles will use and edit, as it incorporates most cases people are planning for. However, there is even more depth to what you can do with angles on Smash Box.
Customizing Default Values
The default values are the values you get when you simply press a direction button without any modifiers. It can be important to customize these values to get more precise angles from your Linear Tilts, or to adjust values according to what game you are playing. (For example, you may want to increase or decrease the default values depending on how a game reads these values - it may require a higher value to read a full press in a single direction, or it may read a full press at a much lower value.)
Changing the default values is similar to editing Multi Tilts, but with one major difference: it doesn't directly show the value a single direction will give you.

As you can see, there are other values to take into consideration and they are all relative to each other. The most important aspect to point out is that you can customize the 'center' values - ie, the values the Smash Box will out put when you are pressing no directional buttons. These center values will also help determine how long/short the Up, Down, Left, and Right values will be.
Note: Multi and Linear Tilts will modify from whatever 'center' value you determine in the Default values.
Keep in mind that the default values work on a 1 to 255 scale, from Left to Right and from Down to Up. (So, for example, 0 on x-axis is as far Left as the Smash Box can output; 255 on x-axis is as far Right as possible; 0 on y-axis is Down; 255 on y-axis is Up.) The values work this way so you can control the center value directly.


Before you start customizing the default values, you may want to have these options selected at the top so you can see what the length of the directions are as you change them.
For now, we are only going to lengthen all of the directions from 83 to 90. No need to edit the center values.


We were able to get the length of 90 for Right and Up. Let's check Left and Down.


And we were able to get the length of 90 for Left and Down too!
Notice that for Left and Down, you have to subtract from the center value, and for Right and Up you have to add to the center value.
C-Stick Values
You can also customize the values of the C-Stick in a similar way. However, the C-Stick values are using a 128 center value for both x- and y-axis, so the values that you edit are technically the length of the C-Stick inputs.

Note: There is no visualizer for C-Stick, so in order to figure out what angle you are getting you will have to do the math manually. Or you can input the same values into a Multi Tilt to see what angle you get.
To best take advantage of C-Stick angles, since it may be difficult to press two C-Stick buttons with a thumb or finger at the same time, you can remap your buttons to help organize the buttons in a way that is comfortable to you, or map the C-Stick Ordinal Modifier onto your layout.
MODE
Throughout this customization process you may have seen labels like "Mode Shift" or "Mode Values." These labels refer to the second set of values you can customize and use in the Smash Box. MODE essentially provides you a second value to each modifier and default, giving you access to far more angles.


When you hold MODE, your Smash Box will output the MODE values that are set instead of the Default values.
MODE values are customized the same way as everything else, with the only difference being that you have to ensure "Mode Shift" is selected when you are trying to see the angle that you are trying to edit.
For more information on MODE, check out our post "What is MODE?"
Angle Visualizer
Everything above we have shown you has been to help you understand the inner workings of customizing values. Now we want to show case a potentially more intuitive way to do customization, once you do have a good understanding of how to use the designer and what angles you want.

This is the Angle Visualizer on the same tab as all of the values we have been editing. It shows you basically what the angle will look like of the options you have selected at the top. In addition, you can hover your mouse on any part of the graph to see what values would make that angle, and you can even click on the graph to edit the values to get that exact angle.
We are going to hover to an angle that gives us 60°.

The green mark is approximately where the cursor is hovering. And in the top right you will see in the bolded font the values that would be needed to get the angle and the angle value itself.
Now we will click to edit the value.

The angle has shifted, as well as the values in the top right. The editable values on the left of the window should also be changed.

This method may be easier for some users, as it is more intuitive and visual.
This guide is to help you get started on customizing the angles in your Smash Box, but does not fully encapsulate the depth of what value customization can do. Be sure to experiment, and share your questions and ideas in the #profiles-and-configs channel in our Discord!
If you are trying to design modifiers to use in Smash or other platform fighters, please use our Input Mappings document as a reference. This will help guide you on how to get the most accurate modifiers for what you want to do.
For more information, check out the "Designer" blog tag or "Index" option below.
If you are having issues with designer, please try our troubleshooting blog: Smash Box Designer Help.